Step 1: Park the chainsaw on a level surface and turn off the engine.
Step 2: Locate the two adjustment screws on the bottom of the chainsaw’s guide bar. One screw is used to tension the chain, while the other is used to adjust the cutting depth of the chain.
Step 3: Loosen the adjustment screws with a Phillips head screwdriver. Do not remove them completely, as they may fall out and be lost.
Step 4: Pull the end of the guide bar away from the chainsaw body until it is loose enough to slide out of its groove.
This will expose part of the chain.
Step 5: Count how many links are in one complete loop of chain, then subtract two from that number. This is how many links you will need to remove in order to shorten your chainsaw chain without using a tool.
For example, if there are 10 links in one loop, you would need to remove 8 links total (10 – 2 = 8).
Step 6: Using a pair of needle-nose pliers, grip each link firmly and bend it back until it snaps apart. Repeat this process until you have removed all of the necessary links from your chainsaw chain.
Be careful not to lose any small pieces that come off during this process.
- Make sure the chainsaw is turned off and the chain is not moving
- Find the master link on the chain
- This is the link that can be opened and closed without tools
- Open the master link and remove a few links from the chain, depending on how much shorter you want it to be
- Close the master link again

Credit: www.bikeradar.com
How Do I Make My Chainsaw Chain Shorter?
If you need to make your chainsaw chain shorter, there are a few different ways that you can do so. One way is to use a pair of pliers to remove one or more of the rivets that connect the links together. Another way is to use a power drill with a metal cutting blade attachment to cut through the metal links.
Whichever method you choose, be sure to wear gloves and eye protection while working with your chainsaw chain.
What Do I Need to Do If My Chainsaw Will Cut Up But Not Down?
If your chainsaw will cut up but not down, there are a few things you can check. First, make sure that the chain is properly tensioned. If the chain is too loose, it can cause the saw to bind and not cut properly.
Second, check the depth of the cut. The depth of the cut should be no more than 1/4 inch deeper than the thickness of the wood being cut. Finally, check to see if the blade is dull or damaged.
A dull or damaged blade can cause the saw to bind and not cut properly.
How Do You Rakers down a Chainsaw?
If you’re new to chainsaws, the prospect of raking them down may seem daunting. But don’t worry – with a little bit of know-how, you can easily keep your saw in good condition. Here’s what you need to know about raking down a chainsaw.
The first step is to identify the parts of the saw that need to be cleaned. The most important part is the chain, which needs to be free of dirt and debris in order to work properly. You’ll also need to clean the bar and sprocket (the part that turns the chain), as well as the engine air filter.
Once you’ve identified all of the parts that need cleaning, it’s time to get started. Begin by disconnecting the spark plug lead from the spark plug – this will prevent the engine from accidentally starting while you’re working on it. Next, remove any debris from around the chain using a brush or cloth.
Be careful not to touch the sharp teeth!
Now it’s time to start disassembling the saw. First, remove the bar guard – this will give you better access to clean all of the parts properly.
Next, loosen but don’t remove the nuts that hold on both ends ofthe bar; this will allow youto slide offthe bar itself so thatyou can clean it more easily.. If your model has a breakaway tip onthe endof thee bar, make sure notto loseit when removingthebar!
Finally, unscrewthe cover overthe air filterand setaside;you’llcleanthis lateron..
Whew!
Now that everythingis unclutteredand easy togetto, let’s move ontoactuallycleaning eachpart:
– Usea softbristlebrushtodebrisfromaroundand underthechain- Gently wipe downall surfacesofthebarto removeany buildup- Clean outanydebrisfrom insideof thee barwith awire brushor similar tool- Soak thenair filterin warmsoapywater for about 15 minutesbefore scrubbingwith alightbrushtoremove anydirt particles
Reassemblyis simply areversalof these steps – onceeverythingis cleanandset backinto place(making surenot totightenthe nutstoo much!),yourchainsawshould becleanerand runningmore smoothlythan everbefore!
What is the Trick to Untangling a Chainsaw Chain?
If you’ve ever had the misfortune of getting your chainsaw chain tangled, you know how frustrating it can be. The good news is, there’s a relatively easy way to untangle it. Here’s what you need to do:
First, find the end of the chain that is not connected to the saw. This is usually the easier end to work with. Next, take a pair of pliers and grab onto one of the cutters on this end of the chain.
Gently twist the cutter back and forth until it comes out of its socket. Repeat this process with all of the cutters on this end of the chain until they are all removed.
Now take a look at the other end of the chain (the one still attached to the saw).
You’ll notice that there are no cutters on this end – only links. Grab onto one link with your pliers and gently pull it outwards until it pops out of its socket. Repeat this process with all of the links on this end of the chain until they are all removed.
At this point, you should be able to simply shake or pull apart the two halves of the chainsaw chain without any trouble.
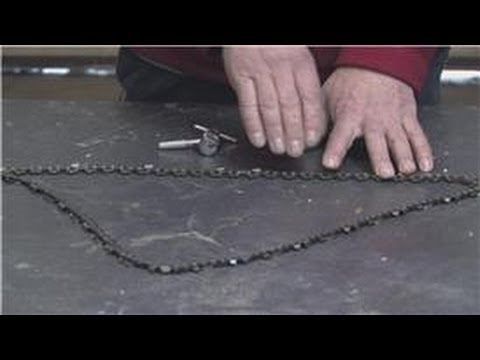
Chainsaws & Tools : How to Shorten the Chain on a Chainsaw
How to Fix a Stretched Chainsaw Chain
If your chainsaw chain is stretched, it’s likely because you haven’t been properly maintaining it. Luckily, it’s not too difficult to fix a stretched chainsaw chain – you just need to know what to do.
First, you’ll need to adjust the tension on the chain.
This can be done by turning the adjusting screw on the side of the chainsaw body. You’ll want to turn it clockwise until the chain is tight, but be careful not to over-tighten it.
Next, you’ll need to file down any sharp edges on the teeth of the chain.
This will help ensure that the chain cuts through wood more smoothly and doesn’t get stuck as easily. Use a round file for this purpose – don’t try to use a flat file, as that could damage the teeth.
Finally, lubricate the chain with bar and chain oil before using it again.
This will help protect against further stretching and wear and tear. Make sure to wipe off any excess oil before using the chainsaw, as too much oil can actually be harmful to both the saw and whatever you’re cutting.
Chainsaw Chain Shortening Tool
If you’ve ever had to deal with a broken chain on your chainsaw, you know how frustrating it can be. The good news is that there are ways to prevent this from happening in the first place. One way is to use a chainsaw chain shortening tool.
This tool is designed to shorten your chainsaw chain by one link at a time. This helps ensure that your chain is always the correct length, which prevents it from breaking or becoming damaged. It’s a small investment that can save you a lot of time and frustration in the long run.
Chainsaw Chain Rivet Tool
If you’re a chainsaw user, then you know that one of the most important parts of the saw is the chain. The chain is what does all the work, so it’s important to keep it in good condition. One way to do this is to use a rivet tool.
A rivet tool is used to connect two pieces of metal together. It’s a very simple process – you just put the two pieces of metal together and then hit them with the tool. The force of the impact creates a strong bond between the two pieces of metal.
Chainsaws use rivets to attach the links in the chain together. over time, these rivets can become loose or even fall out completely. When this happens, it can cause serious damage to your saw.
That’s why it’s important to check your chainsaw regularly and tighten or replace any loose rivets.
If you don’t have a rivet tool, don’t worry – they’re not expensive and they’re easy to find at any hardware store. Just make sure you get one that’s designed for use with chainsaws; otherwise, you might not be able create a strong enough bond between the links.
Diy Chainsaw Chain Breaker
If you’re a chainsaw user, then sooner or later you’re going to need to replace the chain. And if you’re replacing the chain, you’ll need to break it in order to remove it from the saw. This can be a difficult task, but with the right tools and information, it doesn’t have to be.
Here’s what you need to know about breaking chains on a chainsaw.
There are two main types of chainsaws: those with standard guide bars and those with mini guide bars. The type of bar will determine which size breaker you need.
Standard guide bars use 3/8″ pitch chain, while mini guide bars use 1/4″ pitch chain. Once you know which size breaker you need, select the correct one for your saw.
Most importantly, make sure that your saw is turned off and unplugged before beginning this project!
Once your saw is safely off and out of the way, begin by attaching the breaker to the end of the bar opposite of the teeth. For standard guide bars, line up the arrows on the breaker with those onthe bar so that they’re pointing in opposite directions. For mini guide bars, there is no arrow alignment required – simply fit the jaws ofthe breaker overthe endofthe bar until they snap into place.
Withthebreaker securely attachedtooneendofthebar, locateachainlinkontherightsideofthechainthatismostlyexposed(notcoveredbyteeth). Insertthesharpenedjawsintothese exposedlinksandsqueezetightlyuntilyouhearaclicksound-this means thatthe linkhas been cut throughandyoucan release pressurefromthe jaws.
Conclusion
Overall, it is fairly easy to shorten chainsaw chain without a special tool. All you need is a regular saw and a few minutes. Just be sure to measure twice and cut once!


Leave a Reply